Displaying text on a 16x2 LCD screen with a Raspberry Pi
Wiring the screen
To wire the display up, you'll need at least 9 gpio cables, but more than likely 13 for the full 8 bit mode operation. You'll also have to check the Raspberry Pi pinout numbers for the Pi4J library to see where to wire the screen up to, but essentially you can connect it to any gpio headers as long as they're not set up to be used with something else. Some peoples blog posts mention using the serial port gpio headers, but since my project already made use of those to control an SSC32 servo controller, I had to use other ports and it didn't seem to cause any issues.
As per the scren side of things, you'll need to read up on the screens Winstar techsheet or this other version for that, but essentially the pinout is as follows:
1: Ground
2: +5V
3: Not connected
4: RS
5: R/W
6: Strobe/Enable
7: Data1
8: Data2
9: Data3
10: Data4
11: Data5
12: Data6
13: Data7
14: Data8
15: Not connected
16: Not connected
Should end up something like this:
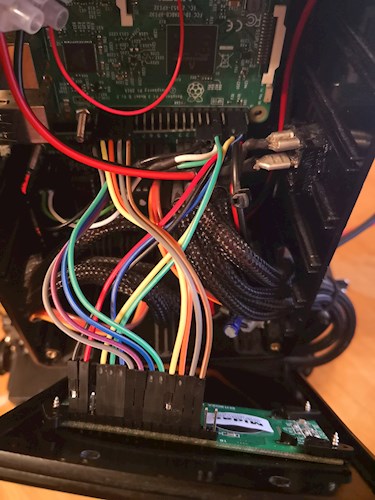
So I've used the following setup, note GPIO numbers refer the the Pi4J pin numbers, not the actual Raspberry Pi pin numbers, see the WiringPi documentation for reference:
Ground = VSS
Ground = RW
+5V = VDD
GPIO_08 = Strobe/Enable
GPIO_09 = RS
GPIO_29 = Data1
GPIO_28 = Data2
GPIO_27 = Data3
GPIO_26 = Data4
GPIO_25 = Data5
GPIO_24 = Data6
GPIO_23 = Data7
GPIO_22 = Data8
By sending RW to ground, we ensure that the screen/display is always set to read only mode and thus making sure that it does not attempt to send data to the Pi using a 5v data connection over the Pi's 3.3v IO pins and potentially cause damage.
Setting up the software
To use Pi4J you call install it into your project just by importing the jar files, but you'll also need WiringPi which for older versions of Pi4J, comes as part of the jar package but with more recent versions such as the most recent snapshot build, it has to be installed separately onto the Pi itself. The people behind the Pi4J project decided this was the best option because you'll be able to take advantage of newer WiringPi builds without having to upgrade the Pi4J libraries.
The main reason why you'd use the the snapshot version over the standard release build is because the latest release build doesn't have built in support for the BMC2835 chip as per this issue that's been posted on GitHub, it's an issue with the Raspberry Pi 3, model B, you'll get a message such as this:
Unable to determine hardware version. I see: Hardware : BCM2835
expecting BCM2708 or BCM2709.
If this is a genuine Raspberry Pi then please report this
to [email protected]. If this is not a Raspberry Pi then you
are on your own as wiringPi is designed to support the
Raspberry Pi ONLY
You must have WiringPi installed on your system as per the Pi4J release notes. You can install WiringPi using GIT or download and compile yourself. According to the WiringPi website you can install GIT using a simple 'apt-get install git-core' command but that probaby isn't going to work since it'll more than likely not find it. So if it's not available you'll have to download it from the website. That's Plan B on the download page where it explains you need to download the latest snapshot from here: https://git.drogon.net/?p=wiringPi;a=summary
The following instructions are from the WiringPi website, but I've duplicated here for redundancy and ease of use.
'This will download a tar.gz file with a name like wiringPi-98bcb20.tar.gz. Note that the numbers and letters after wiringPi (98bcb20 in this case) will probably be different – they’re a unique identifier for each release.
You then need to do this to install:'
$ cd
$ tar xfz wiringPi-98bcb20.tar.gz
$ cd wiringPi-98bcb20
$ ./build
Once that's done you can test the installation using these commands:
$ gpio -v
$ gpio readall
Now you can get back to focusing on using Pi4J and the benefits that the latest snapshot build has to offer.
The Java code
And for some example code, you should be able to use this class in your Java project as is and reference it straight away wothout any change as long a syou wire the screen up the same, if not, you'll have to make sure you update the GPIO numbers within the constructor.
package Utils;

import System.Aimie;
import com.pi4j.component.lcd.impl.GpioLcdDisplay;
import com.pi4j.io.gpio.GpioController;
import com.pi4j.io.gpio.GpioFactory;
import com.pi4j.io.gpio.RaspiPin;

public class Display {
    public final static int LCD_ROW_1 = 0;
    public final static int LCD_ROW_2 = 1;
    public final GpioLcdDisplay lcd;
    private final GpioController gpio;

    public Display() {
        // create gpio controller
        gpio = GpioFactory.getInstance();

        lcd = new GpioLcdDisplay(
                2,                  // number of row supported by LCD
                16,                 // number of columns supported by LCD
                RaspiPin.GPIO_09,  // LCD RS pin
                RaspiPin.GPIO_08,  // LCD strobe pin
                RaspiPin.GPIO_29,  // LCD data bit D0
                RaspiPin.GPIO_28,  // LCD data bit D1
                RaspiPin.GPIO_27,  // LCD data bit D2
                RaspiPin.GPIO_26,  // LCD data bit D3
                RaspiPin.GPIO_25,  // LCD data bit D4
                RaspiPin.GPIO_24,  // LCD data bit D5
                RaspiPin.GPIO_23,  // LCD data bit D6
                RaspiPin.GPIO_22); // LCD data bit D7
    }

    public void shutdown()
    {
        lcd.clear();
        lcd.setCursorHome();
        gpio.shutdown();
        Aimie.display = null;
    }

    public void write(String value)
    {
        clear();
        lcd.write(LCD_ROW_1, value);
    }

    public void write(int lineNumber, String value)
    {
        clear();
        lcd.write(lineNumber, value);
    }

    public void writeln(String value)
    {
        clear();
        lcd.writeln(LCD_ROW_1, value);
    }

    public void writeln(int lineNumber, String value)
    {
        clearln(lineNumber);
        lcd.writeln(lineNumber, value);
    }

    public void clear()
    {
        lcd.clear();
    }

    public void clearln(int lineNumber)
    {
        lcd.clear(lineNumber);
    }
}
As you can see the code is pretty simple.
Potential issues
You might find that your screen displays random text/characters/gibberish as per the image below, I didn't find a software fix for this, because although I had the four data cables connected for 4 bit opperation, it was seemingly still trying to run in 8 bit mode, so my fix for this was to just connect the other 4 cables. I mean, it's not like the Pi doesn't have enough IO ports.
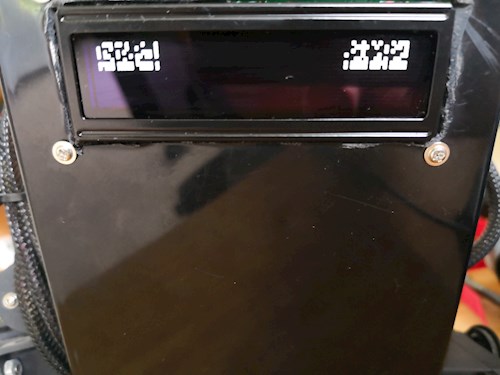
Once you've connected all 8 data cables, you might have to completely shut down the Pi and turn off power to both the screen and the Pi, then turn it on again, or it might continue to display rubbish on screen.
Published at 5 Jun 2018, 08:06 AM
Tags: Java,Robot,Raspberry Pi,Pi4J
